Data Layouts - Create or Modify a Data Layout
Data Layouts allow you to create and save custom sets of data fields for both on-screen display and export.
NOTE: Not all data fields can be exported to Excel.
A Data Layout will normally comprise a small subset of Cityscope data fields corresponding to your specific interest.
Data fields (also referred to as data items) are selected from the "Available Fields" list and moved into the "Selected Items" list with the "Include ->" button. The order, width and alignmnent can then be altered, before the Data Layout is saved via the "Save Changes" button and/or applied by clicking the "Apply" button.
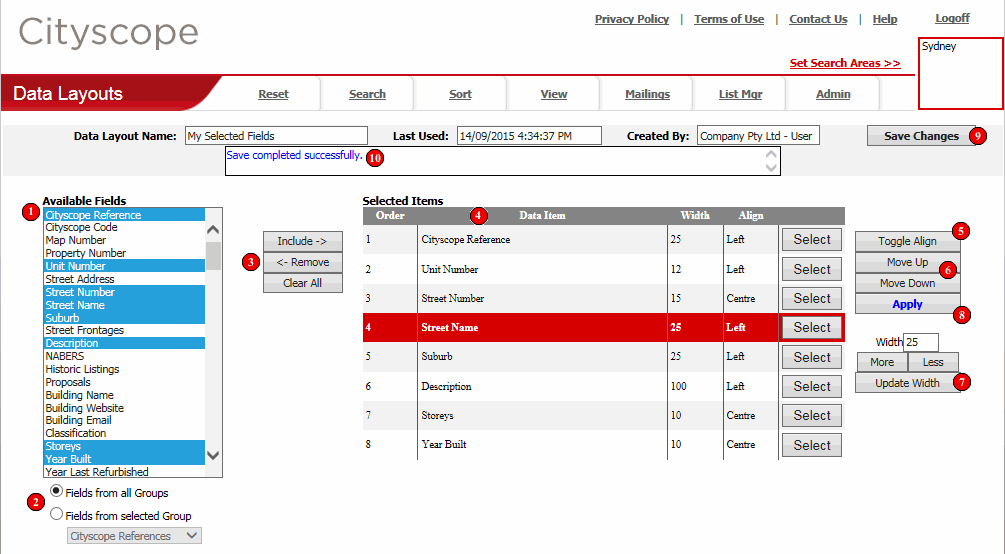
A list of all Cityscope data fields that can be included in your Data Layout.
To select a field, click its name with your mouse. To make multiple selections hold down the Ctrl or Shift key on your keyboard while making the selections.
The list can be scrolled through by clicking the up and down scroll buttons or the scroll bar on the right hand side.
To filter the list of "Available Fields" select the "Fields from selected Group" option and make a selection from the drop down list. The list of "Available Fields" is then filtered to show only data fields that belong to the selected group. Showing data items by group can make it easier to locate the Cityscope data item you are looking for, by reducing the number of items in the list.
When one or more selections have been made from the "Available Fields" list, click the "Include ->" button to move them into the "Selected Items" list.
To remove a data field from the "Selected Items" list, select it in the "Selected Items" list, then click the "<- Remove" button.
To remove all items from the "Selected Items" list, click the "Clear All" button.
The "Selected Items" list shows the data fields that have been selected for inclusion in your Data Layout. The list shows the "Data Item" name, the "Order" it will be displayed/exported, the "Width" it will be displayed and the display "Align". Each item also has a "Select" button for highlighting the field on which you want to perform the selected action (see (3), (5), (6) and (7)).
Toggles the alignment of the "Selected Item" between "Left", "Right" and "Centre". The alignment determines whether the item will be displayed left justified, centred or right justified. To use this function a data item must first be selected by clicking the item's "Select" button.
Moves the "Selected Item" one place up or down in the list of "Selected Items". The order of items in the list determines the order in which the items will be displayed/exported.
Used to change the display "Width" of the "Selected Item". Once a data item has been selected from the "Selected Items" list you can alter its "Width" by either entering a new value in the "Width" box, or by using the "More" or "Less" buttons. Either way, to lock-in the change you need to click the "Update Width" button.
What happens when the "Apply" button is clicked
depends on what part of Cityscope Online you have come from.
NOTE: If you want to "Save Changes" to your Data
Layout you must do so BEFORE clicking the "Apply" button.
See (9).
Most commonly clicking "Apply" will return
you to the View Data screen with the fields
in the "Selected Items" list
being displayed as the <Current Custom Layout>.
NOTE: Even if you plan to export the data, the first step in the process is always
to complete the "Set Custom Layout" function.
If you are generating a Mailings list, clicking the "Apply" button will return you to the Mailings screen, with your field selections stored for the "Produce Mailing List" export.
"Data Layouts" can be saved for reuse later. To save a "Data Layout", enter a "Data Layout Name" in the box provided and click the "Save Changes" button.
Likewise, if you have made modifications to an existing "Data Layout", you must click the "Save Changes" button if you want them to be saved.
![]() Confirmation/Error Message box
Confirmation/Error Message box
Used to display confirmation or error messages relating to the various functions on the page. Confirmation messages are shown in blue, with error messages shown in red.