View Data
The View Data screen is where you can view the data returned by your Map Search, Data Search or Index Lookup. You can choose from a number of pre-defined display layouts using the "Selected Layout" option or make your own through "Set Custom Layout". From the View Data screen you can also "Export Data" to Excel or enter "Print View" where your data is formatted in a way more suitable for printing.
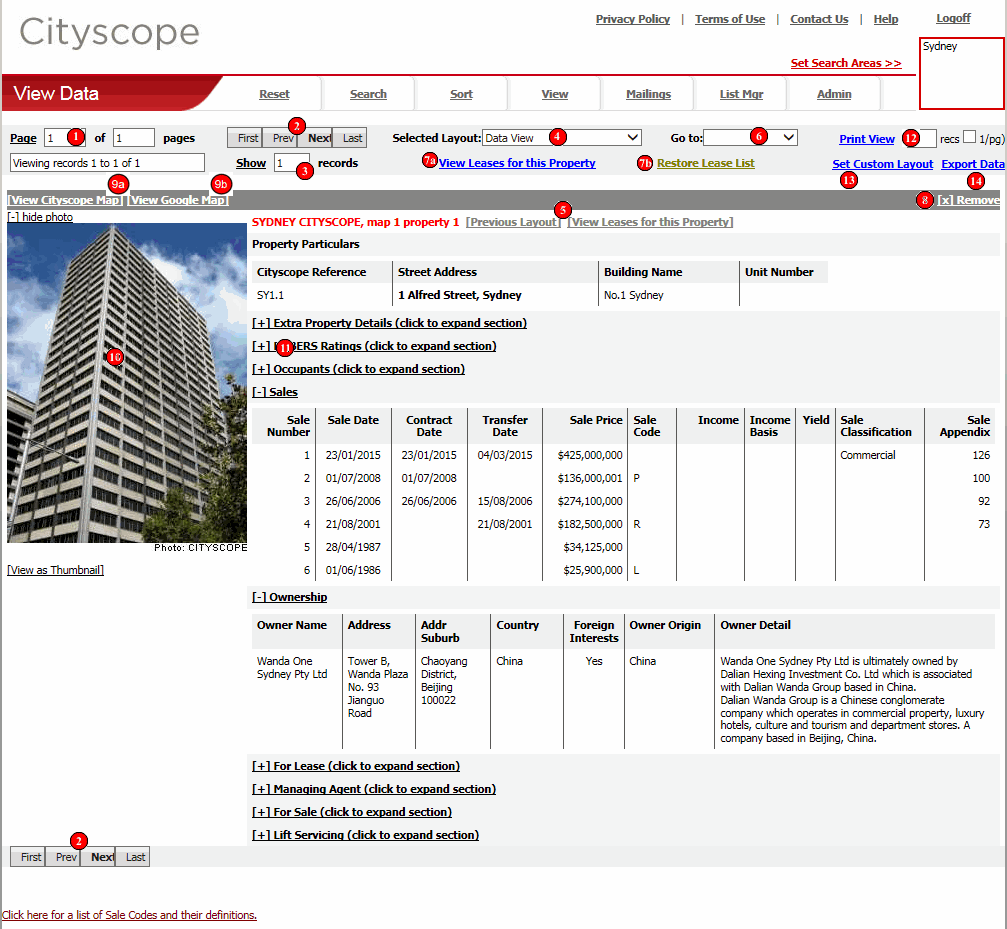
The Page Indicator tells you what page of data you are currently viewing. Different "Layouts" display differing numbers of records per page. For example the predefined "Text View" and "Data View" layouts both show 1 record per page, whereas the "Key Details" layout shows 8 records per page.
Below the Page Indicator is a box that displays the record numbers you are currently viewing. For example, if you had 200 records in your list and were viewing Page 2 of data using the "Key Details" layout (8 records per page of data), the page indicator text would read "Viewing records 9 to 16 of 200".
Visible at both the top and bottom of each page of data are the page navigation buttons "First", "Prev", "Next" and "Last". "Next" will be the most commonly used navigation button. Its function, as the name suggests, is to display the next page of data.
NOTE: In "Print View" Page Navigation buttons serve exactly the same purpose.
Each layout that you can select (from the "Selected Layout" drop down) has a default number of records to display on each page of data. For example the "Key Details" layout displays 8 records per page by default.
If you would like to change the number of records displayed per page you can. Enter the new number of records you want to view per page of data in the box next to the "Show" link, then click the "Show" link. NOTE: Each layout also has a maximum number of records it can display per page. If the number you enter is greater than the maximum, the maximum is used. For example the maximum number of records that can be displayed per page with the "Key Details" layout is 50. So if you were to enter 100 and click the "Show" link, 50 records (the maximum) would be displayed.
Increasing the number of records per page is particularly useful as you are working through lists of data in "<Selected Custom Layout>" or "Key Details" layout. There are however a couple of things to consider:
The information displayed on the View Data screen is determined by the "Selected Layout". The 3 main layouts for both property and lease data are:
To change between layouts, simply choose the layout you want from the "Selected Layout" drop down box.
NOTE: Changing "Selected Layouts" does not lose your position in the list of property or lease records.
a) [Full View]
Depending on the current "Selected Layout" the "[Full View]" link may be visible. The "[Full View]" link is a quick link to the layout regarded by us as the most complete (or full). For both Property and Lease data this is the "Data View" layout. So if you were viewing data using a layout other than "Data View", the "[Full View]" link would be visible.
b) [Previous Layout]
If you click the "[Full View]" link, thereby changing the current "Selected Layout", the "[Restore Previous Layout]" link becomes visible, providing a way to easily restore the layout you were viewing prior to clicking the "[Full View]" link.
c) [View Leases for this Property]
Only available when viewing Property Data and you have a licence to access Leases Data for the Cityscope area. Clicking this link retrieves and displays the property record associated with this lease. See also (6).
d) [View Property Details]
Only available when viewing Leases Data and you have a licence to access Property Data for the Cityscope area. Clicking this link retrieves and displays all leases for the selected property. See also (6).
Provides an easy way to "jump to" any record in your active list of Properties. When you click on the "Go to" drop-down menu, a list of all properties in your current active list will pop out. When you select one of these Cityscope Property References you will be taken to the record for that property, in your current selected layout.
NOTE: This feature is only visible when you are viewing Property data. It will not be visible when viewing Lease data.
![]() View Leases for this Property list/ View Properties for this Lease
list
View Leases for this Property list/ View Properties for this Lease
list
These links provide a way to easily view ALL Leases for a selected list of Properties or ALL Property records for a selected list of Leases.
See also (6).
a) View Leases for this Property list
Only available when viewing Property records and you have a licence to access Lease data for one or more of the Cityscope areas in your current "Set Search Areas". Clicking this link will display ALL Leases for ALL Properties in your list.
b) View Properties for this Lease list
Only available when viewing Lease records and you have a licence to access Property data for one or more of the Cityscope areas in your current "Set Search Areas". Clicking this link will display ALL Properties for ALL Leases in your list.
![]() Restore
Property list/ Restore Lease list
Restore
Property list/ Restore Lease list
Provides a way to restore the previous Property or Lease list.
a) Restore Property List
If, when viewing Property Data, you click either "View Leases for this Property list" or "[View Leases for this Property]", "Restore Previous Property List" provides the mechanism for moving back.
b) Restore Lease List
If, when viewing Leases Data, you click either "View Properties for this Lease list" or "[View Properties Details]", "Restore Previous Lease List" provides the mechanism for moving back.
To remove (or delete) the selected Property or Lease record from your list, click this. The "[x] Remove" function provides a way to further refine lists of Property or Lease records returned from the various search types.
Click this to view the Cityscope map for the selected Property or Lease. To move back to the Property or Lease record you were viewing click "View" from the main menu. NOTE: Cityscope Online will remember what Property or Lease record you were viewing when you clicked [View Map] until you select another property from a map or retrieve new records via a "Data Search" or "Index Lookup". Printing the map via the "Print this map" function does not cause Cityscope Online to lose your place.
Click this to view the Google map for the selected Property or Lease. The Google map will open in a separate browser window, with a pin place on the subject property.
To save the photo image to a file, right mouse click it and choose "Save As". There are rules to using Cityscope photographs. To find out more please read our Photo Usage Guidelines.
Uncompressed true full size images will progressively be made available, simply by clicking on a photo image.
a) [View as Thumbnail] / [View Full Size]
Photos can be displayed in two sizes, referred to as thumbnail size and full size. Use these two functions to toggle between the two different display sizes. Changing the display size affects all photos being displayed. Using the thumbnail size allows for the display of more data.
b) [-] hide photo / [+] show photo
As their names suggest these functions hide and show the photo. The hide photo function is useful if the photo is unimportant and you want to maximise the display of the data.
Some view layouts make use of expandable and collapsible sections. If a section is currently collapsed but can be expanded it will include the [+] symbol next to the section name, together with the text "(click to expand section)". To expand the section, simply click on the section name. If a section is currently expanded but can be collapsed, the section name will also include the [-] symbol. To collapse the section, simply click on the section name.
Print View formats the data you are currently viewing in a way more suitable for printing.
In its simplest use, click Print View to view the data you are looking at ready for printing. You will notice that the main menu is removed and that the overall width of the page is reduced. To Print, click your browsers print button.
NOTE: Print View DOES NOT open in a separate browser window. You therefore SHOULD NOT close your browser window to exit Print View. Closing your browser window while in Print View is the same as closing your browser window anywhere else in Cityscope Online. You will not be able to log on again until the timeout period has elapsed.
To exit Print View click the "Exit Print View" link at the top of the page.
TIP: We recommend using your browser's "Print Preview" function. For Internet Explorer users this is found under the "File" menu. By previewing first, you can check that the data fits neatly. Should the data not fit neatly (as may be the case when printing "Set Custom Layouts" which contain a lot of data, you can change the orientation of the page from portrait to landscape through "Print Preview". In Internet Explorer this is done through the "Page Setup" screen (Alt+U).
Changing the number of records displayed in Print View
Next to the Print View link is a box where you can specify the number of records per page of data. Using this box gives you the ability to more easily print larger numbers of records.
NOTE: When we say "per page of data" we are not referring to a physical piece of paper, but rather a "screen page".
Layouts do have a maximum number of records that can be displayed on each Print View page. If the number you enter in the Print View box is greater than the maximum a message will display indicating that the maximum has been exceeded. You then need to re-enter the number and click the Print View link again.
Moving between "pages" of data in Print View
When in Print View the standard page navigation buttons are still visible, giving you the ability to move through the pages of data in Print View mode.
Print View Example
Let's say you have a done a search that returned 200 property or lease records and are viewing the data in "Text View" layout. Looking at the data on screen in View Data you would be viewing the data one record at a time. Let's now say that you want to print all 200 records. You enter 200 in the "per page" box, then click Print View. Cityscope Online does not go into Print View, instead it displays a message that: "Print View can display a maximum of 25 records for this layout." You enter 25 in the "per page" box and click Print View again. Cityscope Online enters Print View mode. The "Page Indicator" shows you are a viewing "Page 1 of 8 pages" and if you scroll down the screen you can see that each "page" of data comprises 25 records. 8 pages of 25 records per page equals 200 records. Before the first print, you go into "Print Preview" and check that the data is displaying neatly. You exit "Print Preview" then use your browsers "Print" button to print the first "page" of data. The first 25 records are sent through to your printer. You then click the "Next" page navigation button which moves you to "Page 2 of 8 pages", which is the data for records 26 through 50. There is no need to check "Print Preview" again, so you just click your browsers "Print" button. You then click the "Next" page navigation button which moves you to "Page 3 of 8 pages". This process is repeated until all 8 data "pages" (200 records of data) are printed. Once all data has been printed you click "Exit Print View" to return back to the standard View Data screen.
Set Custom Layout allows you to define and save your own group of property or lease data fields to display in View Data. Set Custom Layout is also the first step in the process of doing a custom export of data to Excel (See (14) "Export Data").
The current Set Custom Layout is also available from the "Selected Layout" drop down by choosing "<Current Custom Layout>".
For a full explanation of Set Custom Layout click here.
The Export Data function provides a way to export the data you are currently viewing to Excel. The data fields exported will be those that are displayed by the current "Selected Layout".
If you want to be more selective about the data fields exported (as will commonly be the case) you need to use the "Set Custom Layout" function to specify exactly which fields are to be exported and in what order. For a full explanation of "Set Custom Layout" click here.